18/10/2010

VIEWFINDER

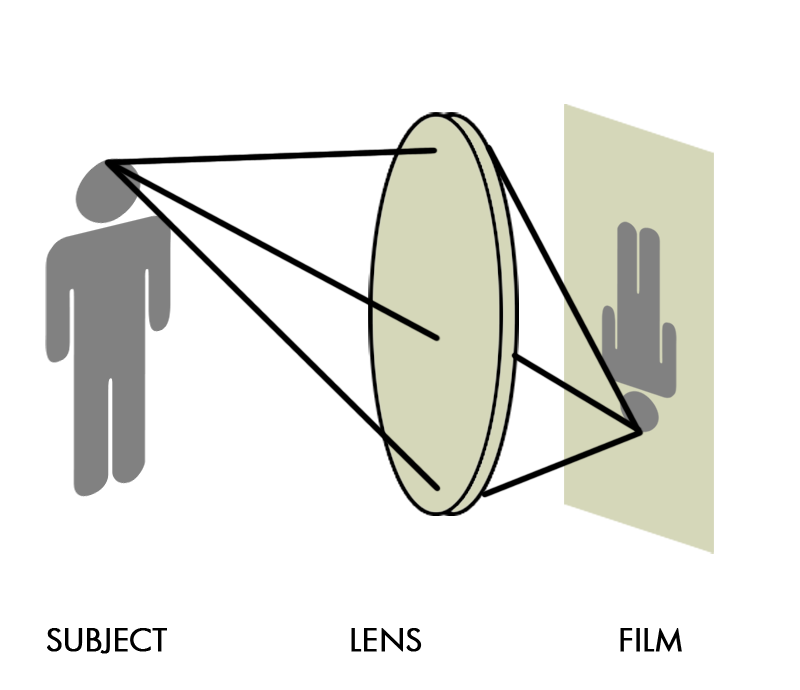
Besides SLR cameras there are also 'point-and-shoot' cameras. The main difference between those two is the way you get to see what you are shooting.

With a 'point-and-shoot' camera the scene through the viewfinder will not correspond with the image through the lens and on the film. The viewfinder in a 'point-and-shoot' camera is just a simple window through the body of the camera. You only get an idea how your end result will look like.


'point-and-shoot' camera


The scene through the viewfinder of SLR cameras is the same image as the one through your lens and on your film. The mechanism behind this can be compared with a periscope of a submarine. The camera has a slanted mirror positioned between the shutter and the lens, with a piece of translucent glass and a prism positioned above it. The prism makes sure that the image is flipped to it's normal position (side up).

SLR camera


When you press the shutter button, the mirror will quickly change his position. This way, the light beams are now directed to the film. The mirror will only come back when the shutter is back shut. This is why the viewfinder is blacked out during the shot.

CONTROL OF LIGHT

There are two ways to obtain the perfect exposure of light on your film.
  1. Control the amount of light passing through the lens
  2. Control the amount of time the film is exposed by light
The Diaphragm / Aperture

The size of the lens opening, also knows as the aperture, let's you change the amount of light going through the lens. A part called the iris diaphragm makes this happen. It consists of a series of overlapping metal plates that move at a certain speed. Just like the iris in your eyes, it controls the diameter where the light is captured.

close-up of a iris diaphragm of a Nikkor 18-55mm lens

one 'closed' and one open iris diaphragm


The Shutter Speed

The amount of time the film is being exposed by light is determined by the shutter speed of the camera. The most common technique is called a focal plane shutter.

You can compare it with the curtains by a window. Before you take a picture, the light is being blocked by the "curtains". This makes sure the film is not yet exposed to any light. Then, when you take the picture the "curtains" open and for a certain amount of time light reaches the film.

To achieve this effect, the camera is filled with gears, switches and springs. When you take a picture, a lever is released and several gears are set in motion. Different shutter speeds are possible by adjusting this mechanism.

example of a focal plane shutter


ISO value

But before you can take the shot, you need to know the right aperture and shutter speed. The ideal settings also depends on the size of the light-sensitive grains in the film. Each film has a certain number. The number stands for the sensitivity of the grain and is called the ISO value. The larger the number, the more light the grain is able to absorb.

For shots in bright sunlight (for example outside on a sunny day) a 100 ISO film is recommended. A 1600 ISO film is suitable in relatively dark places.

a ISO 400 film, with 24 frames

Light meter

To achieve the right exposure cameras are normally equipped with a built-in light meter. A light meter consists of a panel that acts as a semi-conductor light sensor. This makes it extra sensitive to light, which makes it able to make exact data. This data is then used to measure the film and shutter speed.

FILM

The chemical component in a traditional camera is film. A collection of tiny light-sensitive grains, are spread on the film (a strip of plastic) These grains will undergo a chemical reaction when exposed to light.


After a certain amount of photographs, the film roll is ready for developing. The film with the grains will be exposed to different chemicals.

In black and white film, the developer chemicals darken the grains that were exposed to light. This produces a negative, where lighter areas appear darker and darker areas appear lighter, which is then converted into a positive image in printing.

Color film has three different layers of light-sensitive materials, which respond, in turn, to red, green and blue. When the film is developed, these layers are exposed to chemicals that dye the layers of film. When you overlay the color information from all three layers, you get a full-color negative.


But in order to get a decent picture you need to control the exposure of light on your film. The following things are important for a camera with a film roll.
  1. The film has to be kept in the dark before developing.
  2. You have to precisely control the amount of light that hits the film.
If there is to few light on the grains of the film, you're picture will come out too black, and vice versa.

CAMERA LENSES

Professional cameras let you attach different lenses. Each lens has a focul length. This is defined as the distance between the lens and the real image of an object in the far distance. A higher focal length indicates a greater image magnification.

Depending on the subject, a specific lens is recomended. If you want to take a picture of an object that is far away from you, you'll need a telephoto lens. This lens has an especially long focal length.

nikkor 70-300mm (telelens)
a subject with a telelens,
only a small part of the background is visible


For objects near to you, let say portraits of people, you'll need a lens with a smaller focal length.
Nikkor 18-55mm (standard lens)


the same subject, with a large background


A standard 50mm camera lens is ideal for most situations. It doesn't significantly magnify or shrink the image, making it ideal for shooting objects that aren't especially close or far away.

Nikkor 50mm

There are also lenses who try to combine both desired effects. These are of course more expensive.

Nikkor 18-200mm


BASIC LENS

The optical component of the camera is the lens. You can compare this with glasses. It consists out of a curved piece of glass or plastic. The lens takes the light beams and forms these to a real image. The image represents all the light beams from in front of the lens.

How is light formed to an image? The piece of glass in a lens slows down the light it's speed. Light travels much faster in air than in a piece of glass.

Since a lens is curved, some light beams will reach the glass before another and slow down first. When entering the glass, the light will bends in a certain direction. The same happens when the light exits the glass. This will reverse the path of light from an object. 

The light path and the formed image depend on two major factors.
  1. The angle of the light beam's entry into the lens
  2. The structure of the lens
When you move the object closer or father away from the lens, the angle of the light is changed. This will result in a different image. A lens bends light beams to a certain total degree, no matter the light beam's angle. This total "bending angle" is determined by the structure of the lens.


To focus an image, you turn the lens of your camera. What you actually doing is changing the distance between the lens and the film. The perfect distance is called the focal point.


BASIC PRINCIPLES

As everybody knows, an camera allows us to capture moments in time and to preserve those memories. The technology behind this all is fairly simple.

Every camera is made of three basis elements;

  1. an optical element (the lens)
  2. a chemical element (the film) 
  3. a mechanical element (the camera body itself). 
When these three parts are perfectly combined, you've got yourself a photograph.

The camera I found and will discuss is a point-and-shoot camera. The camera did belong to my grand-father.


08/10/2010

WELCOME

Welcome at my blog called "Analog Camera For Dummies; How Does It Work?" This blog is part of a school assignment. The idea is that people who visit this blog (even if they have never heard of an analog camera) will eventually understand anything there is to know about an analog camera. This blog will mainly handle the body of the camera (of an analog SLR camera) and all it's mechanical parts, materials and other significant features.

I chose this subject because one of my personal hobby's is photography. I found this old analog camera, which belonged to my grandfather. It is this device that will inspire me troughout the course.

Petri 7 camera

Petri 7 camera

I've found most of the information on the following websites;